
- About ZenTao Enterprise
- Installation
- Update and Upgrade
- 3 Update ZenTao Enterprise
- 3 Upgrade from Open Source to Enterprise
- 3 Upgrade from Pro to Enterprise
- Users and Privileges
- DevOps Management
- Office Automation
- Feedback Management
- Document Management
- Workflow
- 9 Build-in Workflow
- 9 Workflow Introduction
- 9 Example: Customize Build-in Workflows
- 9 Example: Add a Workflow
- 9 JS and CSS
- ZenTao Desktop
Workflow Introduction
- 2019-09-03 13:09:50
- John Ten
- 3633
- Final Edition:tengfei De 2020-04-29 16:32:03
ZenTao Enterprise 3.5.alpha has added the Flow feature. You can customize it so to make ZenTao fit your workflow.
Fields, actions, layout and data as built in ZenTao can be customized and used to extend rewrite ZenTao built-in workflows.
1. Glossary
- Flow: It is a feature in ZenTao, just like Product, Project and QA in ZenTao.
- Field: It is the field saved in the database and the data item displayed on the interface, such as Name, Add Time, and Assignee.
- Action: It is a specific action in ZenTao, such as Create, Review, and Reject.
- Condition: It is a condition on which a button or an action will be triggered, such as the status is Wait for a review.
- Extended Action(result): It is the action that you link updated data(field) after an action is done.
- Verification: When you search an variable with a value or a field with a value, verification is displayed to give tips to users who just do the search.
- Notification: Set users who will receive email notifications after an action is done.
- Layout: A layout for an action, including the field and position of the action.
- Datasource: It is the source of the data displayed in the drop-downs. You can call the build-in functions, SQL statements and customize it.
- Rules: It is t verify the format of the data via regular expressions.
- Child Table: It is to record the specifications of flows.
- List Tab: Tabs on the list page of a flow. You can click the tab to filter flows, such as All.
- Sub Flow: It is displayed on the secondary menu of a flow. A sub flow cannot have a sub flow.
2. Flow
Go to Flow and click Create Flow to open a window to add the information about the new flow. Click Save and you will see it displayed on the navbar.
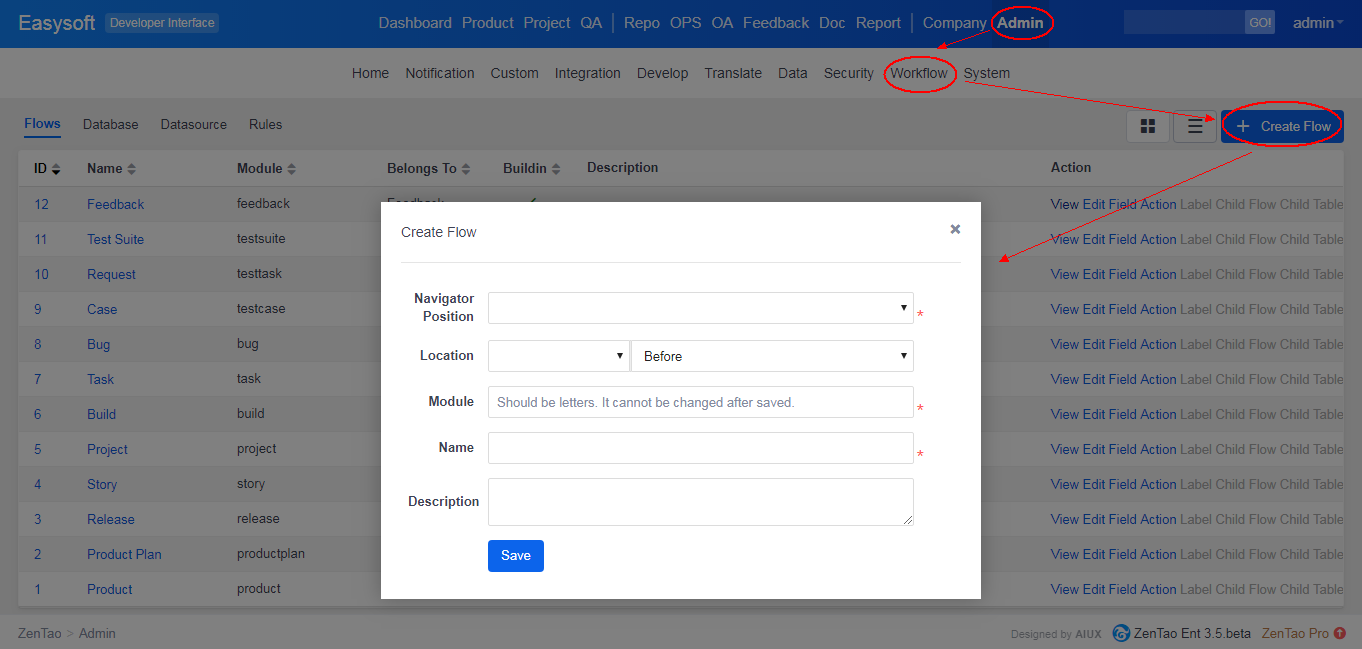
- NavBar: It is where the flow will be displayed, either the first level menu or the secondary menu.
- View: If choose the secondary navbar, you should choose the View that this flow belongs to.
- Position: It is where the flow is displayed on the page, such as before or after a navbar or menu.
- Alias: It is the alias for a flow, no space or special characters are allowed. Once it is saved, it cannot be changed later.
- Name: The name of the flow.
- Description: A description of the flow.
3. Field
Click Field button to manage the field. A field is also created in the corresponding database table. You have to check the box of the newly added field in the Action layout, so it will be displayed in the Flow.
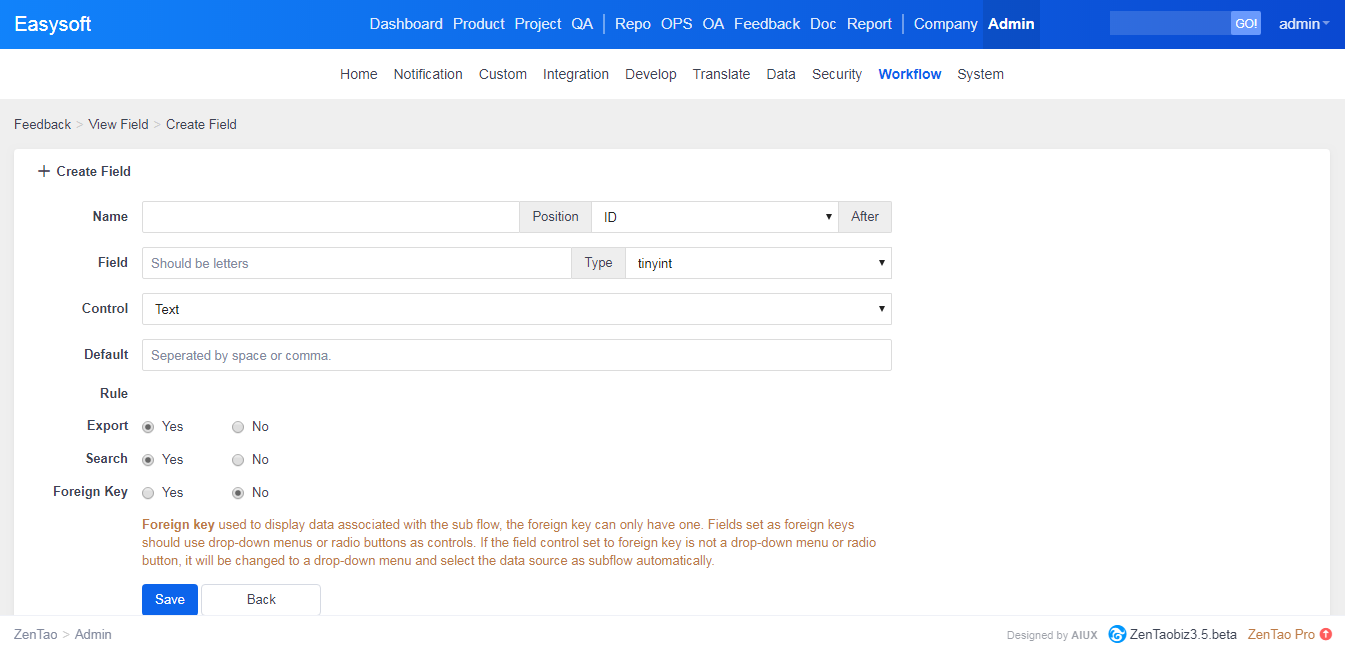
- Name: Data item of a field saved in the database or name displayed on the page.
- Position: It is where the field is displayed on the layout.
- Alias: Letters only for record the field in the database.
- Type: Numbers(tinyint, smallint, mediumint, int, decimal, float, double), date and time(date, datetime, timestamp), and strings(char, varchar, text).
- Control: Labels, text boxes, rich text, date, time, drop-down menus, radio buttons, and checkboxes.
- Default: The default value displayed when a control is selected.
- Rules: It is t verify the format of the data via regular expressions.
- Export: It is to set whether the field can be exported.
- Search: It is to set whether the field can be searched.
- Foreign Key: It is used to display the data of a sub flow, and there can only be one foreign key. Fields set as foreign keys should use the drop-down menu or radio button as the control. If not, it will set the control as a drop-down menu by default and select the data source as a sub flow.
4. Action
Click Create Action button at the upper right to add a new action to the build-in flow. Actions of a build-in flow do not need to be extended. If you have to edit an action, you can change the Extend Way to Extend or Rewrite.
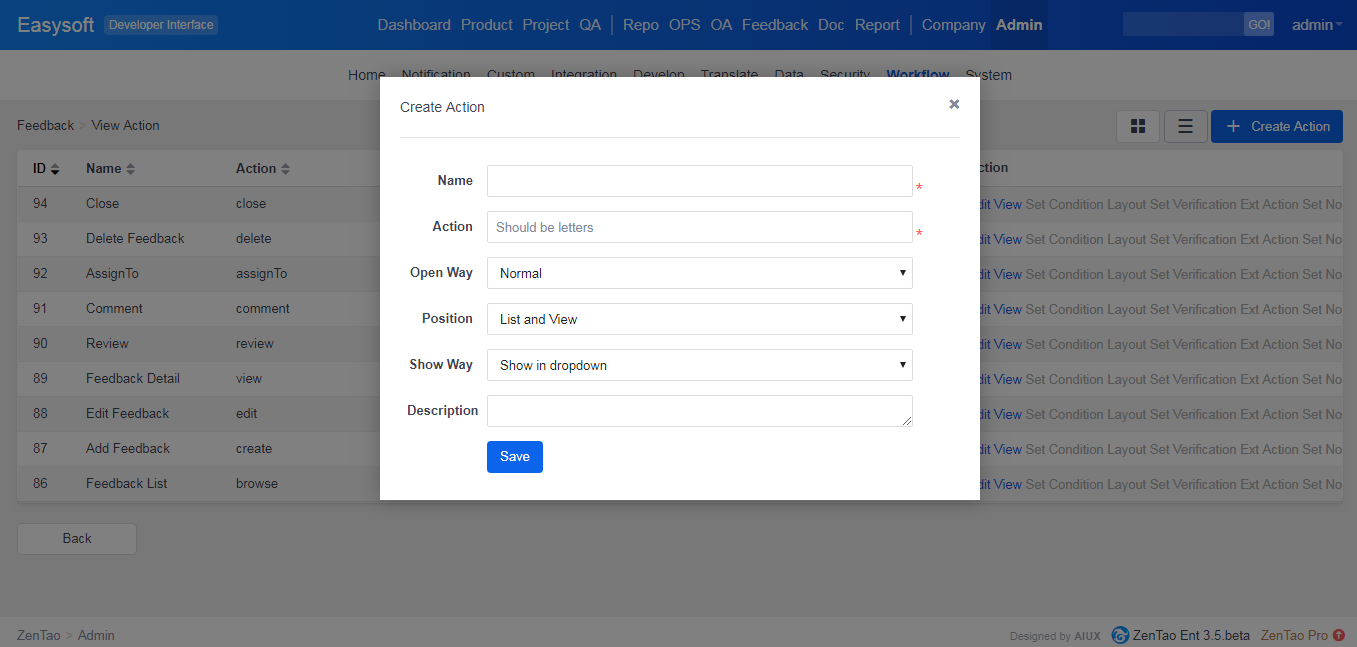
- Name: Name of the actions just created.
- Alias: It is the alias for the added action, no space or special characters are allowed. Once it is saved, it cannot be changed later.
- Open with: The way to open the page, including Normal, Popout, and None.
- Position: It is where the action will be displayed, including Menu, List, Details, and Both List and Details pages.
- Display: It is how the action is displayed, including on the page and in the drop-down.
- Description: A description of the action.
5. Database
You can add a table in your database to save detailed and linked data. Its data can searched in the data source and the action results can be saved to it.
6. Data Source
Data source is used in fields for generating data for drop-downs. You can also call functions, customizations and SQL statements.
7. Rules
Rules are used to verify fields, and forms. You can use regular expressions to do that.
If any questions, contact us at Troy@easycorp.ltd.
Produit
- ZDOO
- ZDOO Cloud
- ZSITE
Contactez-Nous
- A propos de nous
- Courriel: Philip@easycorp.ltd
- WhatsApp: 0086 18563953295
- Skype: philip517


